Those living off the grid can get free water by digging a well. If you know how to install a well, it is the way to have a steady water supply. Otherwise, you will need a professional service to do it on your behalf.
Meet all your domestic water needs by digging a well.
If located in a place with plenty of underground water, it can supply water for irrigation, gardening, and watering animals. You can also be assured of water all year round.
In this post, we will discuss types of water wells and a DIY approach to water well installation.
These steps to install a well should be straightforward if you have the technical ability required. Keep reading for detailed steps.
Can You Install Your Own Well?

There is a DIY approach and professional services to digging a water well. You do not necessarily need to have those huge commercial drilling rigs to drill residential water well.
In fact, doing it by hand is more fun and satisfying than hiring a professional contractor to do it for you.
However, drilling or digging a residential water well by hand is time-consuming since you may not have heavy equipment.
There is also a higher risk of injuries and accidents, all of which are undesired. A poorly dug well on the property can also attract fines from the local authorities.
Professional water well drilling services are sometimes preferred because they are quick and proficient.
The staff is trained on the lurking dangers, and everything else is sometimes insured against accidents. They are all trained professionals who make little to no mistakes when at work.
Also, the contractor can help you fill a report or get all the legal documents needed to dig a well on your property.
However, their services are usually beyond the reach of many off-gridders. They are expensive.
If you have to decide between DIY or hire services for your well, just weigh the pros and cons of both.
Mostly, homeowners would go for the DIY approach when the budget for digging the well is limited or personal satisfaction.
3 Types Of Wells

Wells are of three types: drilled, dug, and driven wells. These are brought about by the method used in digging the well.
What you choose depends on the cost, underground water, and soil components. Some are better on rocky areas and where the water table lies deep below the ground.
Drilled wells
Drilled wells are also known as artesian wells. They are preferred where the water table is deep below the ledge rock or bedrock.
A submersible pump is usually inserted into the bottom of the well after it is dug to help pump water out. They are more reliable than other water well types.
Driven wells
This is the most common method used today when installing well. It involves driving a small diameter pipe through the ground, which mainly consists of sand, gravel, and clay.
A screen is placed at the bottom of the casing pipe to filter water, the reason why some people refer to this water well type as a screen well.
Driven wells are difficult to install because of the energy needed to drive the metal pipe into the ground. On the brighter side, you get high-quality water from such wells.
Dug wells
Dug wells, as the name suggests, are dug by hand using backhoes. They are usually between 8 and 14 feet long and best suited for areas with shallow water tables, and the ground is sandy or has soft gravel.
When digging this well, you need to locate it away from the roads and livestock.
9 Steps To Install A Well

You can dig a well by hand using locally available tools. Dug wells are the simplest to install by this approach.
However, you need to be keen on the steps. Nine steps are involved in well digging, and they include the following:
- Step 1: Choosing an Area
- Step 2: Drilling The Well
- Step 3: Test Your Water Quality
- Step 4: Installation Well Casing
- Step 5: Installation Well Screens
- Step 6: Grouting
- Step 7: Cleaning Excess Sediment At The Bottom
- Step 8: Attach The Pump
- Step 9: Inspect And Protect The Wellhead
Your well should be reliable if the steps are followed to the latter. Keep reading for detailed information.
Step 1: Choosing an Area
The first step is crucial in every DIY project. If you get it wrong, you will not be anywhere close to a reliable well.
So, take all your time in choosing the site for your well. The best site for a dug well should be safe and away from septic tanks, fuel tanks, sewage systems, or pasture land.
Also, check local laws if you are permitted to dig a well on the property. Regulations can be set to protect underground water from depletion or overexploitation.
They also ensure that your water well is safely located and supply clean water for home use. Hiring an expert is the best way to go about it.
Lastly, you need to consider your area. It is not recommended to dig a well in a marshy or wet location because of the dangers involved.
The well can collapse or can become a breeding place for waterborne, disease-causing microorganisms.
Check this article to know if you can dig a well anywhere.
Step 2: Drilling The Well

The actual method of drilling the well depends on the approach you take and the soil composition of the site chosen from the previous step.
You can choose a hand auger, a well-point, or a DIY drill. Each involves energy-intensive steps and will only work in areas with soft gravel or other soft earth mass.
Rocky terrain will require drilling offered by professional water well drilling service providers.
As part of choosing the site for the well, determine the possible soil composition to decide on the most appropriate water well digging method. Move to the next step if you have reached the water table or underground water.
Step 3: Test Your Water Quality
Most well water is not suitable for drinking. To ensure it is fit for human and animal consumption, disinfect your well soon after drilling.
Also, you have to remember that the first few gallons of water will be muddy and might not be preferred for domestic use.
After passing the above steps, you need to test the quality of water. The process involves determining the quantities of minerals in it. The more the minerals, the harder the water will be and might not be usable.
Water testing also reveals the presence or absence of bacteria and other microorganisms in water. Take a sample to the nearest water testing facility and wait for the results before using the water.
Proceed to the next step of securing your well if the water is safe for domestic use. Otherwise, the well should be covered by returning the loose earth into it.
Step 4: Installing Well Casing
A water well casing is a tubular structure that runs the entire length of the well to keep it open. It also prevents possible contamination of underground water by surficial water and other contaminants.
This is the pathway through which water will flow from the bottom of the well to the surface.
Water well casings can either be carbon steel, stainless steel, or plastic, depending on the state laws, and are installed only when the well can produce safe water. It is not necessary if the previous step proved otherwise.
Step 5: Installation Well Screens
Install a good screen at the end of the well casing to filter water. It prevents sediments from passing into the well to contaminate water. They can be continuous slots, slotted pipes, or perforated pipes.
4″ Water Well Screen

- 4" Water Well Screen
You can purchase a good screen or use a homemade well screen, depending on your preference. Both should ensure you always have clean water from the well. Proceed to the next step if done with well screen installation.
Step 6: Grouting

Grouting is the process of placing a sealing material such as neat cement or bentonite to fill the space left between the well casing and the borehole created during well-digging or drilling (annulus).
It is done to protect public health and maintain groundwater quality.
Grouting should be done well if you want to prevent contamination of underground water by surface runoffs, and only after well casing and well screen installations.
Use these best grouting tips to ensure it is done correctly.
Step 7: Cleaning Excess Sediment At The Bottom
Well sediments consist of grit, sand, gravel, dirt, soil, tannins, etc. These sediments lower the water quality, rendering it unusable domestically.
Sedimentation in a well can be facilitated by the following factors:
- Soil particle deposition during well digging.
- Well pump lying too close to the bottom.
- Well pump is unnecessarily big.
- Damaged or worn out well screens and casings.
- Corrosion in the pipe.
Before inserting the submersible pump into the well, remove any soil particles and other earth materials that got into the well during well digging.
Also, you need to correctly size the pump and install it at the correct depth to avoid sedimentation from reoccurring.
Step 8: Attach The Pump

Attach a submersible pump to the well casing to pump water out of the well after removing all the sediments. It is often coupled with a pressure tank that supplies water to all the areas where the water is required.
Alternatively, it can pump water to an overhead tank from which water flows by gravity to the taps. Ensure the pump is installed correctly.
Hallmark Industries MA0414X-7A Deep Well Submersible Pump
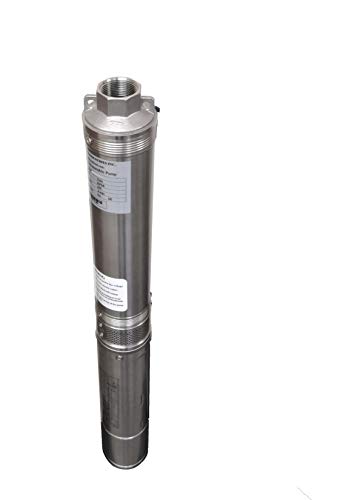
- 4" deep well submersible pump, 1HP, 230V, 33 GPM, 207 feet head, long life
- Solid stainless steel body with heavy duty thermal plastic discharge
- Industrial grade heavy duty, also good for home usage
Step 9: Inspect And Protect The Wellhead
This is the last step and it involves inspecting the wellhead. A wellhead is a system of spools, valves, and adapters used for controlling the water pressure from the well.
They are commonly used on drilled wells. For a long service life, you should regularly check the wellhead and offer protection throughout.
You can fence around the wellhead to avoid possible physical damage caused by people or livestock.
FAQs
How much does it cost to put in a well?
The cost of installing a well depends on the type of well, depth, and terrain. You can expect to pay $15-$30 per foot when digging a well of soil, gravel, clay, or any other soft rock.
It can go up to $50 per foot on terrain with bedrocks. Many people spend a total of between $1,500 and $12,000 to put up a water well.
How deep should a well be for drinking water?
A general rule of thumb is that the deeper the well, the better the water quality. Water for household use, such as drinking, should be between 100 feet to 500 feet deep.
But that depends on the level of underground water. Note that well water might not be safe for drinking until it is treated.
How long do wells last?
A properly constructed well has a lifespan ranging from 25 years to more than a century.
The service life of any well will depend on the maintenance, type of soil, and how the well was constructed. A long-lasting well will obviously cost more to put up.
What type of well is best?
Drilled wells are the most reliable water sources because they are installed by professionals who know how to locate groundwater.
They usually provide water all year round, regardless of the prevailing weather conditions. However, they are the most expensive well types.
Conclusion
Wells can help you have a constant water supply for domestic use. Fortunately, some water well types can be dug by hand using locally available tools.
Consider the steps in this article to install a well that suits your water needs and do not forget to check the local laws and regulations.
As always, thank you for choosing emoffgrid.com as your reading source! If you are reading this article of ours, I hope you find the shared information helpful.